
How to Stay Always Online in Japan: Nomad Japan Travel eSIM Review
Upon arriving in Tokyo, my priority was to get reliable internet without hassle. I researched eSIM providers, such as Airalo and Holafly, and ultimately chose Nomad’s Japan Travel eSIM. It transformed my trip from day one, keeping me connected while I explored the streets of Tokyo, Kyoto, and relaxed on the beaches of Okinawa.
Note: Some links in this article are affiliate links. If you click and make a purchase, I might earn a small commission (at no extra cost to you). It helps me keep this blog running, so thank you!
Note: Some links in this article are affiliate links. If you click on a link and purchase a service, I may earn a small commission at no extra cost to you. It helps me keep the blog running, so thank you!
Table of Contents
My ranking
Overall Rating
Pros & Cons
| Pros | Cons |
|---|---|
| Easy eSIM set up and activation | No SMS and voice |
| Fast registration to the network in Japan | Must activate eSIM within 60 days of purchase |
| Reliable speeds in cities | More expensive than competitors |
Why I Chose Nomad Japan Travel eSIM
I picked Nomad over other providers like Airalo and Holafly for a few reasons:
- Plan flexibility: Nomad’s dedicated Japan plan offered the right data packages for my needs.
- Competitive pricing: Their cost per GB was reasonable, and I even got a discount as a new user.
- Reliable past experiences: I had used Nomad eSIMs before and was generally satisfied, so I was eager to try their Japan option.
- I wanted to see how it performs in Japan and compare it to the competitors.
Nomad Japan Travel eSIM Plan Options
Nomad makes it easy to find a plan that suits your Japan itinerary. The Japan Travel eSIM comes in two flavors:
Nomad offers eSIM plans for Japan, including:
- Regular Data Plans: Fixed data (1 GB to 50 GB) valid for 7 to 30 days, starting at around $6/£4.47.
- Day Pass (Unlimited) Plans: Short-term plans with daily high-speed limits, throttled thereafter. Prices start around $11/£8.19 for a 3-day period.
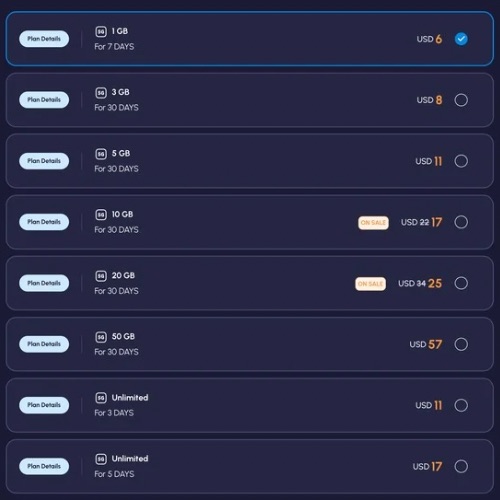
All plans are prepaid with no hidden fees. Check for promotions to save money.
Nomad utilises KDDI and SoftBank for coverage, offering a reliable service nationwide.
Savvy’s Tip: Ensure your phone is unlocked and compatible with eSIMs before making a purchase. While most newer smartphones support eSIM functionality, you can check Nomad’s compatibility list if you’re unsure.
How I Tested Nomad Japan Travel eSIM
I used the Nomad eSIM throughout my trip to Japan and tested it in various real-world scenarios each day. My phone is an unlocked dual-SIM device (Samsung Galaxy S22), which allowed me to keep my physical UK SIM card for calls and text messaging while using the eSIM for data. Here’s a summary of my experience:
Setup and installation
Setup Rating
I purchased the eSIM through Nomad’s website a few days before my flight. After payment, I received a QR code and detailed installation instructions via email. I found two options for installing the eSIM: scanning the QR code and following the manual instructions in case I experienced issues with the QR code. I recommend installing it at home on stable Wi-Fi to avoid relying on airport connections.
The process was easy:
- I went to Settings → Connections → SIM manager → Add eSIM.
- I scanned the QR code from the email.
- The Nomad Japan Travel eSIM profile downloaded and appeared among my other eSIMs.
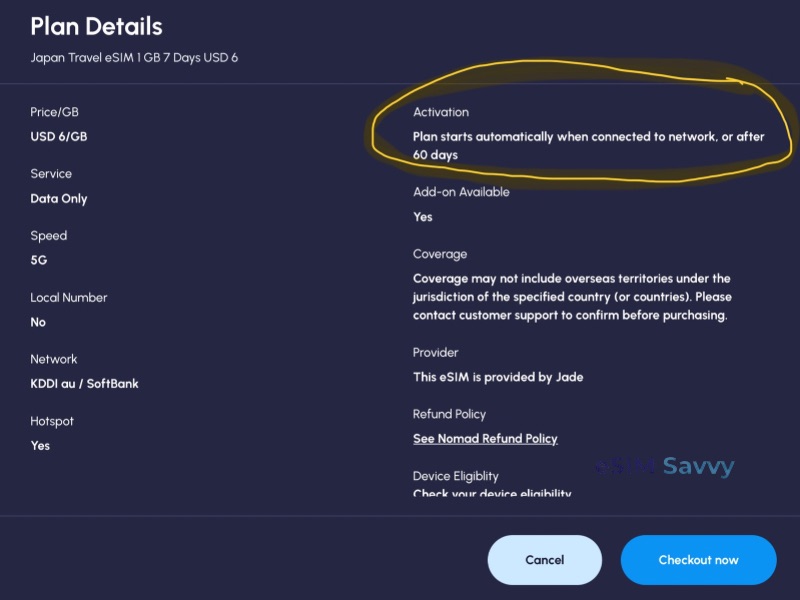
Savvy’s Tip: Always check activation information. Don’t buy the Nomad Japan Travel eSIM too early, as it will activate automatically 60 days after purchase.
The eSIM downloaded quickly, and I didn’t need to add details manually or restart my phone. Nomad also offers an app that enables quick installation without a QR code, making it particularly convenient, and lets you purchase plans later.
Savvy’s Tip: Install the eSIM before travelling in a location with good Wi-Fi, and ensure your device is eSIM-compatible and unlocked. The app includes a compatibility checklist.
Network registration in Japan
Network Registration Rating
Upon landing at Narita Airport in Tokyo, I switched off flight mode and enabled the Nomad eSIM for mobile data, keeping my primary SIM active for texts and calls. I always turn off the data before switching on flight mode. I had a bad experience in Qatar, where something went wrong and my phone used my personal SIM card for data connection, which cost me a lot.
My phone quickly connected to SoftBank’s network, showing “R” and 4G icons next to the signal strength bars. “R” means roaming. Once I enabled data, I could see arrows going both directions.
Savvy’s Tip: Always check if you can see these arrows going both directions. It means your phone is sending (arrow up) and also receiving (arrow down) data.
To test it, I opened a web browser, and the page loaded almost instantly. Fortunately, no manual activation or additional configuration was required. Nomad’s eSIM auto-activated right away, beginning my 7-day validity period without any hassle.
In the past, I had eSIMs that required manual activation of the eSIM profile through the app or website, but this was a truly plug-and-play experience. I noticed this issue when the eSIM was provided by “Joytel” and “Nomad Black”.
Savvy’s Tip: Nomad’s installation email notes that if the eSIM doesn’t start automatically, you might need to tap an “Activate” button in the app.
Reliability and User Experience
User Experience Rating
I used the Nomad eSIM during my travels from Tokyo to Kyoto and Okinawa, and it was a solid and reliable connection. Here are some key highlights:
- Consistent 4G and 5G: I usually had 4G/LTE, with occasional 5G in central areas. I even got a signal in remote spots, the metro underground and elevators.
- Apps and Browsing: Google Maps worked flawlessly for navigation, and I efficiently uploaded photos to Instagram, checked emails, and browsed the web without issues.
- Streaming & Social Media: I made a stable video call on Signal from Kyoto and watched YouTube on the bullet train. Posting Instagram Stories was seamless.
- Tethering: I connected my Nintendo Switch to play games without any lag.
I encountered no dead zones in the major tourist areas, and even on Okinawa’s main island, I had a strong signal. Overall, the user experience was excellent, as it felt just like having a local data plan.
Savvy’s Tip: Before purchasing the eSIM, check coverage on nperf website.
Connectivity and Speed
Connectivity&Speed Rating
To test the speed of a mobile network, I use application called Speedtest from Ookla.
For the Nomad Japan Travel eSIM, I conducted speed tests near the crowded Sensō-ji Temple in Tokyo, where I recorded download speeds of approximately 37.5 Mbps and upload speeds of around 1.55 Mbps.
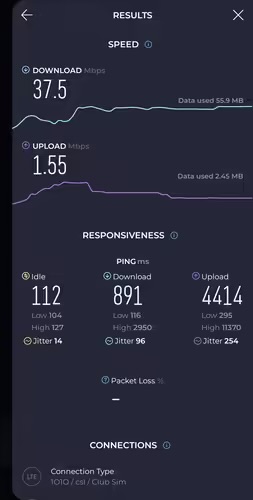
With Japan’s national average download speed at 50–52 Mbps, this was impressive for a busy location. In less crowded areas, speeds felt even faster, and I noticed quicker loading times in Tokyo compared to Okinawa.
However, speed isn’t everything; latency and consistency matter too. Websites were responsive, Google Maps worked smoothly, and YouTube videos played without interruption. Even on 4G, I rarely noticed a difference. For travellers needing maps, messaging, and entertainment, the Nomad eSIM speeds were more than sufficient.
Top-up
Top-up Rating
Nomad makes it easy to add data if you run low. I started with a 1 GB plan for a week and managed to get by without extra data thanks to hotel Wi-Fi. In case I needed it, I checked the top-up process.
In the Nomad app, go to “Manage” and select Japan eSIM. Then simply tap “Add More Data” next to your eSIM plan to view available add-ons, such as 1 GB or 3 GB packs. The payment process is simple, and the additional data activates automatically once your original plan is exhausted. It’s seamless; you don’t lose connectivity while switching.
Top-up prices match the initial plan rates, so a 1 GB add-on costs around $6/£4.47, just like the original plan. This flexibility allows you to start small and add more later.
Savvy’s tip: Adding a new plan does not extend the validity of your original plan. For instance, if your initial eSIM plan is valid for 30 days and you buy and activate a 7-day plan, the new plan will only last for 7 days. It is treated as a new eSIM plan.
Nomad Discount Codes
Who doesn’t love a good deal? One perk of using Nomad is that they often have referral or promo codes for new users. If you’re a new Nomad user, take advantage of my Nomad referral code LEOS92MM to get $3 off your first eSIM plan. (That was enough to essentially get a 1 GB plan at half price in my case!)
To use a code, typically enter it during the purchase process on Nomad’s website/app, and the discount will be applied to your total. Nomad occasionally offers seasonal discounts or flash sales on select plans (like now for 10 GB and 20 GB plans).
Nomad App (Android & iPhone)
Nomad provides a mobile app for managing their eSIMs, and I found it quite handy during my trip. The app is available on both Android and iOS. I initially used the website to purchase my eSIM, but I later installed the app to monitor my plan.
Here’s what the Nomad app offers:
- Browse and Purchase eSIMs: Easily search for and buy eSIM plans by country or region within the app, similar to an e-commerce experience.
- In-App eSIM Installation: If your phone supports it, the app installs the eSIM without needing a QR code. After purchase, it guides you through adding the new plan, making it hassle-free. For my next trip, I will use the app for eSIM installation instead.
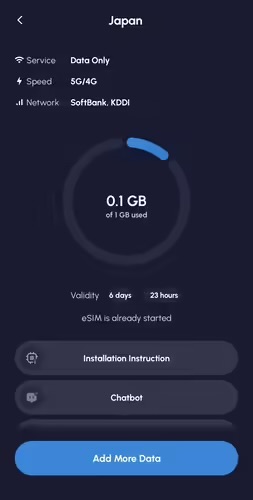
- Dashboard for Usage: The app shows your current eSIMs and data usage. For instance, I tracked my usage and saw I had around 900 MB left of 1GB that I could use for 6 days and 23 hours, which helped me plan for the rest of the week.
- Top-up and Plan Management: Adding data is a breeze with a one-click button.
- Support and FAQs: There’s a help section, and you can contact support via chat or email, with 24/7 availability. Fortunately, I didn’t need help during my trip.
Overall, the Nomad app streamlined my eSIM experience, making it convenient to manage connectivity. Just remember to download it before you leave, especially if you’ll be without data initially.
Savvy’s Tip: Download the app before your trip to Japan.
Tips for Using eSIM Data in Japan
ou’re a first-time eSIM user or a seasoned traveler, here are some pro tips to help you make the most of your Nomad Japan eSIM (and generally stay connected securely in Japan):
- Download and Set Up Everything Before Travel: Install your eSIM while you’re still at home, and consider downloading the Nomad app, as well as any essential apps (such as Google Maps, translation apps, and VPNs) in advance.
- Monitor Your Data Usage: Keep an eye on your data with the Nomad app or your phone’s tracker. I used about 300–500 MB daily with web browsing and social media, but I also had other eSIMs. If you have a smaller plan, limit high-bandwidth activities or use hotel Wi-Fi.
- Have a backup for remote areas: While cities generally have good signal coverage, remote areas may experience issues. Download offline maps from Google Maps and keep your hotel Wi-Fi information handy.
- Keep your primary SIM for calls and SMS: The Nomad Japan Travel eSIM is data-only, so make sure to keep your regular SIM active for SMS and calls. Just remember to set your data connection to the eSIM.
- Use free Wi-Fi when convenient: Japan offers reliable free Wi-Fi in cafés and hotels. Take advantage of it to save your mobile data for when it is truly needed. Always connect to a VPN on public Wi-Fi to protect your data.
By preparing and using these tips, I stayed connected and secure during my trip with Nomad’s reliable eSIM service.
Pros & Cons
Nomad’s Japan Travel eSIM turned out to be a fantastic travel companion for my trip. Like any service, it has its strengths and a few limitations. Here’s a quick rundown:
| Pros | Cons |
|---|---|
| Easy purchase and setup: Buy online and activate instantly | Data-only service (no voice calls or SMS capability) |
| Multi-network coverage: Uses both SoftBank and KDDI for excellent signal. | Must activate within 60 days of purchase (plan auto-starts if you forget) |
| Reliable performance throughout cities, suburbs, and even on trains/metro | Unlimited data packs are short-term and have speed caps after daily limit |
| Wide range of plans (Japan-only, regional, global) and data sizes up to 50 GB | Cannot be extended beyond 30 days without top-up (for trips over a month, you’ll need multiple plans |
| Easy data top-ups. | eSIM-compatible phone required: Works for most modern devices, but not all older or carrier-locked ones. |
Conclusion – Is Nomad eSIM Worth It for Japan?
If you’re travelling to Japan and need unlimited data, I recommend using Nomad’s Japan Travel eSIM. For basic connectivity during your travels, Nomad’s eSIM is an excellent choice. However, for plans of 1 -20 GB, there are cheaper options available, so it’s a good idea to compare prices.
If you plan to stay in Japan for more than 30 days, consider looking for a different eSIM.
Throughout my stay, the Nomad eSIM remained reliable, whether I was enjoying crowded Sensō-ji or sharing photos from rainy Okinawa. It performed well even on the fast bullet train from Kyoto to Tokyo.
Ready to stay connected in Japan the easy way? I suggest giving Nomad Japan Travel eSIM a try. It truly enhanced my travel experience.
Say goodbye to roaming fees and konnichiwa to instant internet access!
Frequently Asked Questions (FAQ)
Can I make calls or send SMS with the Nomad Japan Travel eSIM?
No, this is data-only, so it doesn’t provide a phone number for voice calls or SMS. If you need to make calls, you can keep your physical SIM for voice/SMS (incurring roaming fees) or use internet-based services like Signal, Telegram, or WhatsApp. Nomad does not offer SMS and voice services.
How do I top up my Nomad eSIM if I run out of data?
Yes. Topping up your data is easy with Nomad. You can do it through the Nomad app or their website. Find your Japan eSIM and tap “Add more data” to see available top-up packages. Select the data amount you want, complete the purchase, and the new data pack will be linked to your existing eSIM. Once your current data is used up, the add-on activates automatically.
Remember, you need an internet connection to top up, so consider finding Wi-Fi if you’re out of data. You can also top up before running completely dry.
Is my phone compatible with Nomad eSIM?
You need an unlocked, eSIM-compatible device (e.g. recent iPhone, Google Pixel, Samsung S-series). Nomad also mentions device compatibility on their FAQ. Generally, if your phone was released in the last 3-4 years, there’s a good chance it has eSIM capability. Or check your manufacturer’s specs and ensure your carrier has enabled eSIM functionality before purchasing.
Make sure your device is unlocked. If your phone is still locked to your home mobile operator/carrier, it might refuse to accept a Nomad eSIM.
If you have more questions about using eSIMs in Japan, feel free to leave them in the comments. I’m happy to share more from my experience. Have a great trip and enjoy your time in Japan with all the internet access you need!